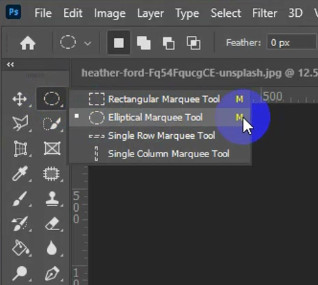
It is used to create elliptical or circular selections. To create an elliptical selection place the mouse pointer over the Marquee Tools icon and right-click then choose the Elliptical Marquee Tool in the tools panel.
 |
| Elliptical Marquee Tool |
Drag the mouse and draw a selection of ellipses.
We can create a selection of a circle with the Elliptical Marquee Tool. To create a selection of a circle drag the mouse and hold down the shift key on the keyboard.
You can enable the Anti Alias in the options bar. If you enable Anti Alias and cut out a selection then the edges of the cutout selection will be smooth. If you uncheck the Anti Alias option then the edges of the cutout selection will be rough and jagged.
3. Single Row Marquee Tool:
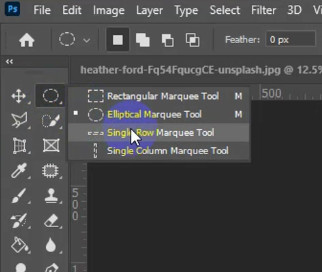
It creates a straight selection of one-pixel Height and Width across the entire canvas. Place the mouse pointer over the Marquee Tools icon and right-click then choose the Single Row Marquee Tool in the tools panel.
 |
| Single Row Marquee Tool |
Click on your image then you will see a straight selection of one-pixel Height and Width across the entire canvas.
4. Single Column Marquee Tool:
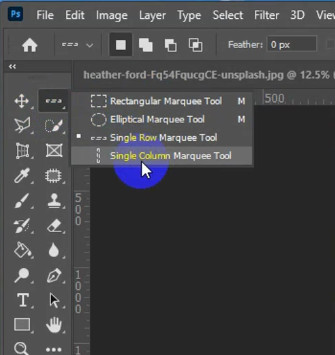
It creates a straight selection of one-pixel Width and Height across the entire canvas. Place the mouse pointer over the Marquee Tools icon and right-click then choose the Single Column Marquee Tool in the tools panel.
 |
| Single Column Marquee Tool |
Click on your image then you will see a straight selection of one-pixel Width and Height across the entire canvas.
With the (Single Row Marquee Tool)/ (Single Column Marquee Tool), you can apply various adjustments or effects to the selected row/column, such as changing the color, adding a gradient, or applying a filter. You can use the (Single Row Marquee Tool)/(Single Column Marquee Tool) to create borders or separators between different sections of an image or design. For example, you can use it to create a horizontal/vertical line to separate two paragraphs of text. We can create patterns or designs by selecting and duplicating rows/columns of pixels in an image with the (Single Row Marquee Tool)/(Single Column Marquee Tool).
How to copy, and paste a selection and then create a new document?
Sometimes you need to select a specific part of an image and copy it to create a new document. To create a new document from the selected part first select any part of the image by any marquee tool. I will choose the Rectangular Marquee Tool to select a part of an image.
After selecting go to the Edit menu then choose Copy (Keyboard shortcut: Ctrl+C).
Go to the File menu and choose New( Keyboard shortcut: Ctrl+N).
A new window will appear. You can name the New Document. Click on Create.
Now a document is created.
Go to the Edit menu and choose Paste( Keyboard shortcut: (Ctrl+V).
The selected rectangular part will fit on the canvas of the new document.
Marquee Tools Options
When you enable Marquee Tools then you will notice the Options Bar under the menu. Here are four Options.
1. New selection:
By default, the New Selection is checked in the options bar. Select any marquee tool, click and drag with a marquee tool, and a new selection will be created.
2. Add to selection:
Make a selection with any marquee tool on your canvas, Let's say you make a selection with the Rectangular Marquee Tool. Now create another selection with any marquee tool over any part of the rectangle. let's say we create a selection of a circle with the Elliptical Marquee Tool by enabling Add to Selection on the options bar.
You will notice that the existing selection did not disappear and the new selection is added.
3. Subtract from selection:
You can subtract any part of a selection. Let's say you make a selection of a circle. You can subtract any part from the circle by enabling "Subtract from selection" in the options bar and creating any other selection. We can subtract by creating a rectangular selection from the circle selection.
You will notice the second selection will disappear and create a new selection.
4. Intersect with selection:
The "Intersect with selection" makes a new selection where the first and the second selection meet. Let's say you have made a selection of a circle. Enable the "Intersect with selection" in the options bar. Make any selection over the first selection(circle). Let's say you make another selection of a circle over any part of the first circle.
Now you will notice a new selection where the first and the second circle selection overlay.


